- Defining the variables
- Defining the computer choice method
- Defining the rock, paper, and scissors methods
- Connecting the methods and buttons
We have designed the game GUI in the previous lesson. Now, let’s write some Python code to implement the working of the game.
Defining the variables
First of all, we will create variables for user score, computer score, user choice, and computer choice.
We will initialize the scores with “0” and the choice variables with empty strings.
1
2
3
4
| USER_SCORE = 0
COMP_SCORE = 0
USER_CHOICE = ""
COMP_CHOICE = "" |
Defining the computer choice method#
We know that the user selects an option from Rock, Paper, or Scissors by clicking a button. But, how will the computer select its choice? Let’s create the method `random_computer_choice()’ to do that.
Inside this method, the computer will choose an option randomly and return it. We can import and use the random module in Python for this.
1
2
3
4
| USER_SCORE = 0
COMP_SCORE = 0
USER_CHOICE = ""
COMP_CHOICE = "" |
Defining the rock, paper, and scissors methods
Now, we will define three methods for the three buttons. When a user clicks a button, the corresponding method will be invoked. The method for the “Rock” button will assign the value
to the
variable. We will also call the
1
| random_computer_choice() |
method from this method for the computer to select its choice. We will pass these two choices to another method called
, which we will define later.
1
2
3
4
5
6
| def rock():
global USER_CHOICE
global COMP_CHOICE
USER_CHOICE='rock'
COMP_CHOICE=random_computer_choice()
result(USER_CHOICE,COMP_CHOICE) |
We made these variables global so that we can use them across the entire program.
Let’s define the methods for the “Paper” and “Scissors” buttons using the same logic.
1
2
3
4
5
6
7
8
9
10
11
12
| def paper():
global USER_CHOICE
global COMP_CHOICE
USER_CHOICE='paper'
COMP_CHOICE=random_computer_choice()
result(USER_CHOICE,COMP_CHOICE)
def scissors():
global USER_CHOICE
global COMP_CHOICE
USER_CHOICE='scissors'
COMP_CHOICE=random_computer_choice()
result(USER_CHOICE,COMP_CHOICE) |
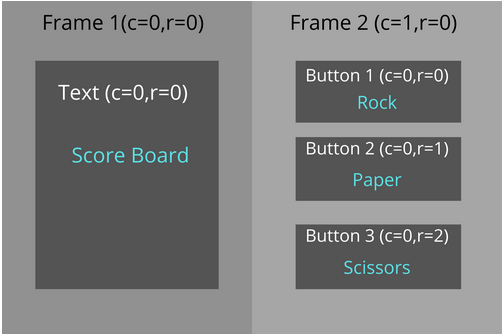
Connecting the methods and buttons#
Let’s put these variables and methods in our GUI app above the code for our widgets. That way, these methods will be available for the buttons to use.
We will link these methods with the buttons using the command option.
1
2
3
4
5
6
7
8
9
10
11
12
13
14
15
16
17
18
19
20
21
22
23
24
25
26
27
28
29
30
31
32
33
34
35
36
37
38
39
40
41
42
43
44
45
46
47
48
49
50
51
52
53
54
55
56
57
| import random
import tkinter as tk
window = tk.Tk()
window.geometry("400x300")
window.title("Rock Paper Scissors Game")
USER_SCORE = 0
COMP_SCORE = 0
USER_CHOICE = ""
COMP_CHOICE = ""
def random_computer_choice():
return random.choice(['rock','paper','scissors'])
def result(x,y):
print("We will define it soon...")
def rock():
global USER_CHOICE
global COMP_CHOICE
USER_CHOICE='rock'
COMP_CHOICE=random_computer_choice()
result(USER_CHOICE,COMP_CHOICE)
def paper():
global USER_CHOICE
global COMP_CHOICE
USER_CHOICE='paper'
COMP_CHOICE=random_computer_choice()
result(USER_CHOICE,COMP_CHOICE)
def scissors():
global USER_CHOICE
global COMP_CHOICE
USER_CHOICE='scissors'
COMP_CHOICE=random_computer_choice()
result(USER_CHOICE,COMP_CHOICE)
frame1 = tk.Frame(window, padx=5, pady=5)
frame1.grid(column=0,row=0,pady=5)
frame2 = tk.Frame(window)
frame2.grid(column=1,row=0)
text_area = tk.Text(master=frame1,height=12,width=30,padx=10,pady=10,bg="#CAD5E2")
text_area.grid(column=0,row=0)
text_area.insert(tk.END,"\n\nYour Score : 0 \nComputer Score : 0 \n \nClick on any button to start.")
button1 = tk.Button(frame2,text=" Rock ",bg="#50DBB4",padx=20,pady=25,command=rock)
button1.grid(column=0,row=0)
button2 = tk.Button(frame2,text=" Paper ",bg="#50DBB4",padx=20,pady=25,command=paper)
button2.grid(column=0,row=1)
button3 = tk.Button(frame2,text=" Scissors ",bg="#50DBB4",padx=20,pady=25,command=scissors)
button3.grid(column=0,row=2)
window.mainloop() |
In the above code, we just created new methods and defined some variables. We did not add any functionality as of now. That is why the output is the same, and the buttons are not executable at the moment.
So, with that, we have the user choice and computer choice inputs ready. Now, we need to process these two variables and perform the calculations and updates.